This section introduces using ChartDirector in ASP.NET MVC / Razor Pages. For ASP.NET Web Forms, please refer to The First ASP.NET Web Forms Project. For Windows Forms, please refer to The First Windows Forms Project. For WPF, please refer to The First WPF Project.
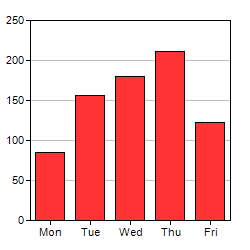
To get a feeling of using ChartDirector, and to verify the ChartDirector development environment is set up properly, we will begin by building a very simple bar chart.
The following is based on one of the charts in the sample project "NetMvcCharts". If you have not yet tried the sample project, it is highly recommended you try them now. Please refer to the Installation section for details. They are very useful for exploring and testing the features of ChartDirector.
The sample project "NetMvcCharts" is for ASP.NET MVC. The code for ASP.NET Core MVC and ASP.NET Core Razor Pages are very similar. Please refer to the code in the sample projects "NetCoreMvcCharts" and "NetCoreRazorCharts" for details.
To create a chart in ASP.NET MVC, the basic method is to create the chart in the controller and assign it to a RazorChartViewer. The RazorChartViewer can then be used in the view to generate the HTML for the chart. The step by step instructions are as follows:
- Add a reference to ChartDirector to your ASP.NET MVC project. See Using ChartDirector in Your Own Projects.
- Add an empty controller and add the following line at the top of the controller:
using ChartDirector;
- Add the following code in the controller, replacing the "Index" method automatically generated by Visual Studio if any. The main part of the code is the "createChart" method. It creates a chart with an HTML image map for tooltips, and assign them to the RazorChartViewer.
public ActionResult Index()
{
    // Create a chart using a newly created RazorChartViewer as the container.
    // We use the ViewBag to store the RazorChartViewer so that we can use it
    // in the view.
    createChart(ViewBag.Viewer = new RazorChartViewer(HttpContext, "chart1"));
    return View();
}

private void createChart(RazorChartViewer viewer)
{
    // The data for the bar chart
    double[] data = {85, 156, 179.5, 211, 123};

    // The labels for the bar chart
    string[] labels = {"Mon", "Tue", "Wed", "Thu", "Fri"};

    // Create a XYChart object of size 250 x 250 pixels
    XYChart c = new XYChart(250, 250);

    // Set the plotarea at (30, 20) and of size 200 x 200 pixels
    c.setPlotArea(30, 20, 200, 200);

    // Add a bar chart layer using the given data
    c.addBarLayer(data);

    // Set the labels on the x axis.
    c.xAxis().setLabels(labels);

    // Output the chart
    viewer.Image = c.makeWebImage(Chart.PNG);

    // Include tool tip for the chart
    viewer.ImageMap = c.getHTMLImageMap("", "", "title='{xLabel}: {value} GBytes'");
}
- Add an empty view for the Index method with the following code, replacing the code automatically generated by Visual Studio if any. The code uses the RazorChartViewer (stored as ViewBag.Viewer) to output the HTML for the chart with tooltips. The @Html.Raw indicates to Razor that the output is HTML. Without @Html.Raw, Razor will escape HTML tags. For example, <IMG> will become <IMG>, which is not what we want.
@{ Layout = null; }

<!DOCTYPE html>
<html>
<body>
    @Html.Raw(@ViewBag.Viewer.RenderHTML())
</body>
</html>
- You can now press the "Start" button to compile the code and view the page. The page should contain a chart with HTML tooltips.
Note: The trial version of ChartDirector will include small yellow banners at the bottom of the charts it produces. These banners will disappear in the licensed version of ChartDirector.